Bringing Home Your New Baby Chicks

5 things to do before you bring them home. Peep.

You’re bringing home your new baby chicks! That’s great! Raising chickens is rewarding but there are a few important things to do before your little ones come home.
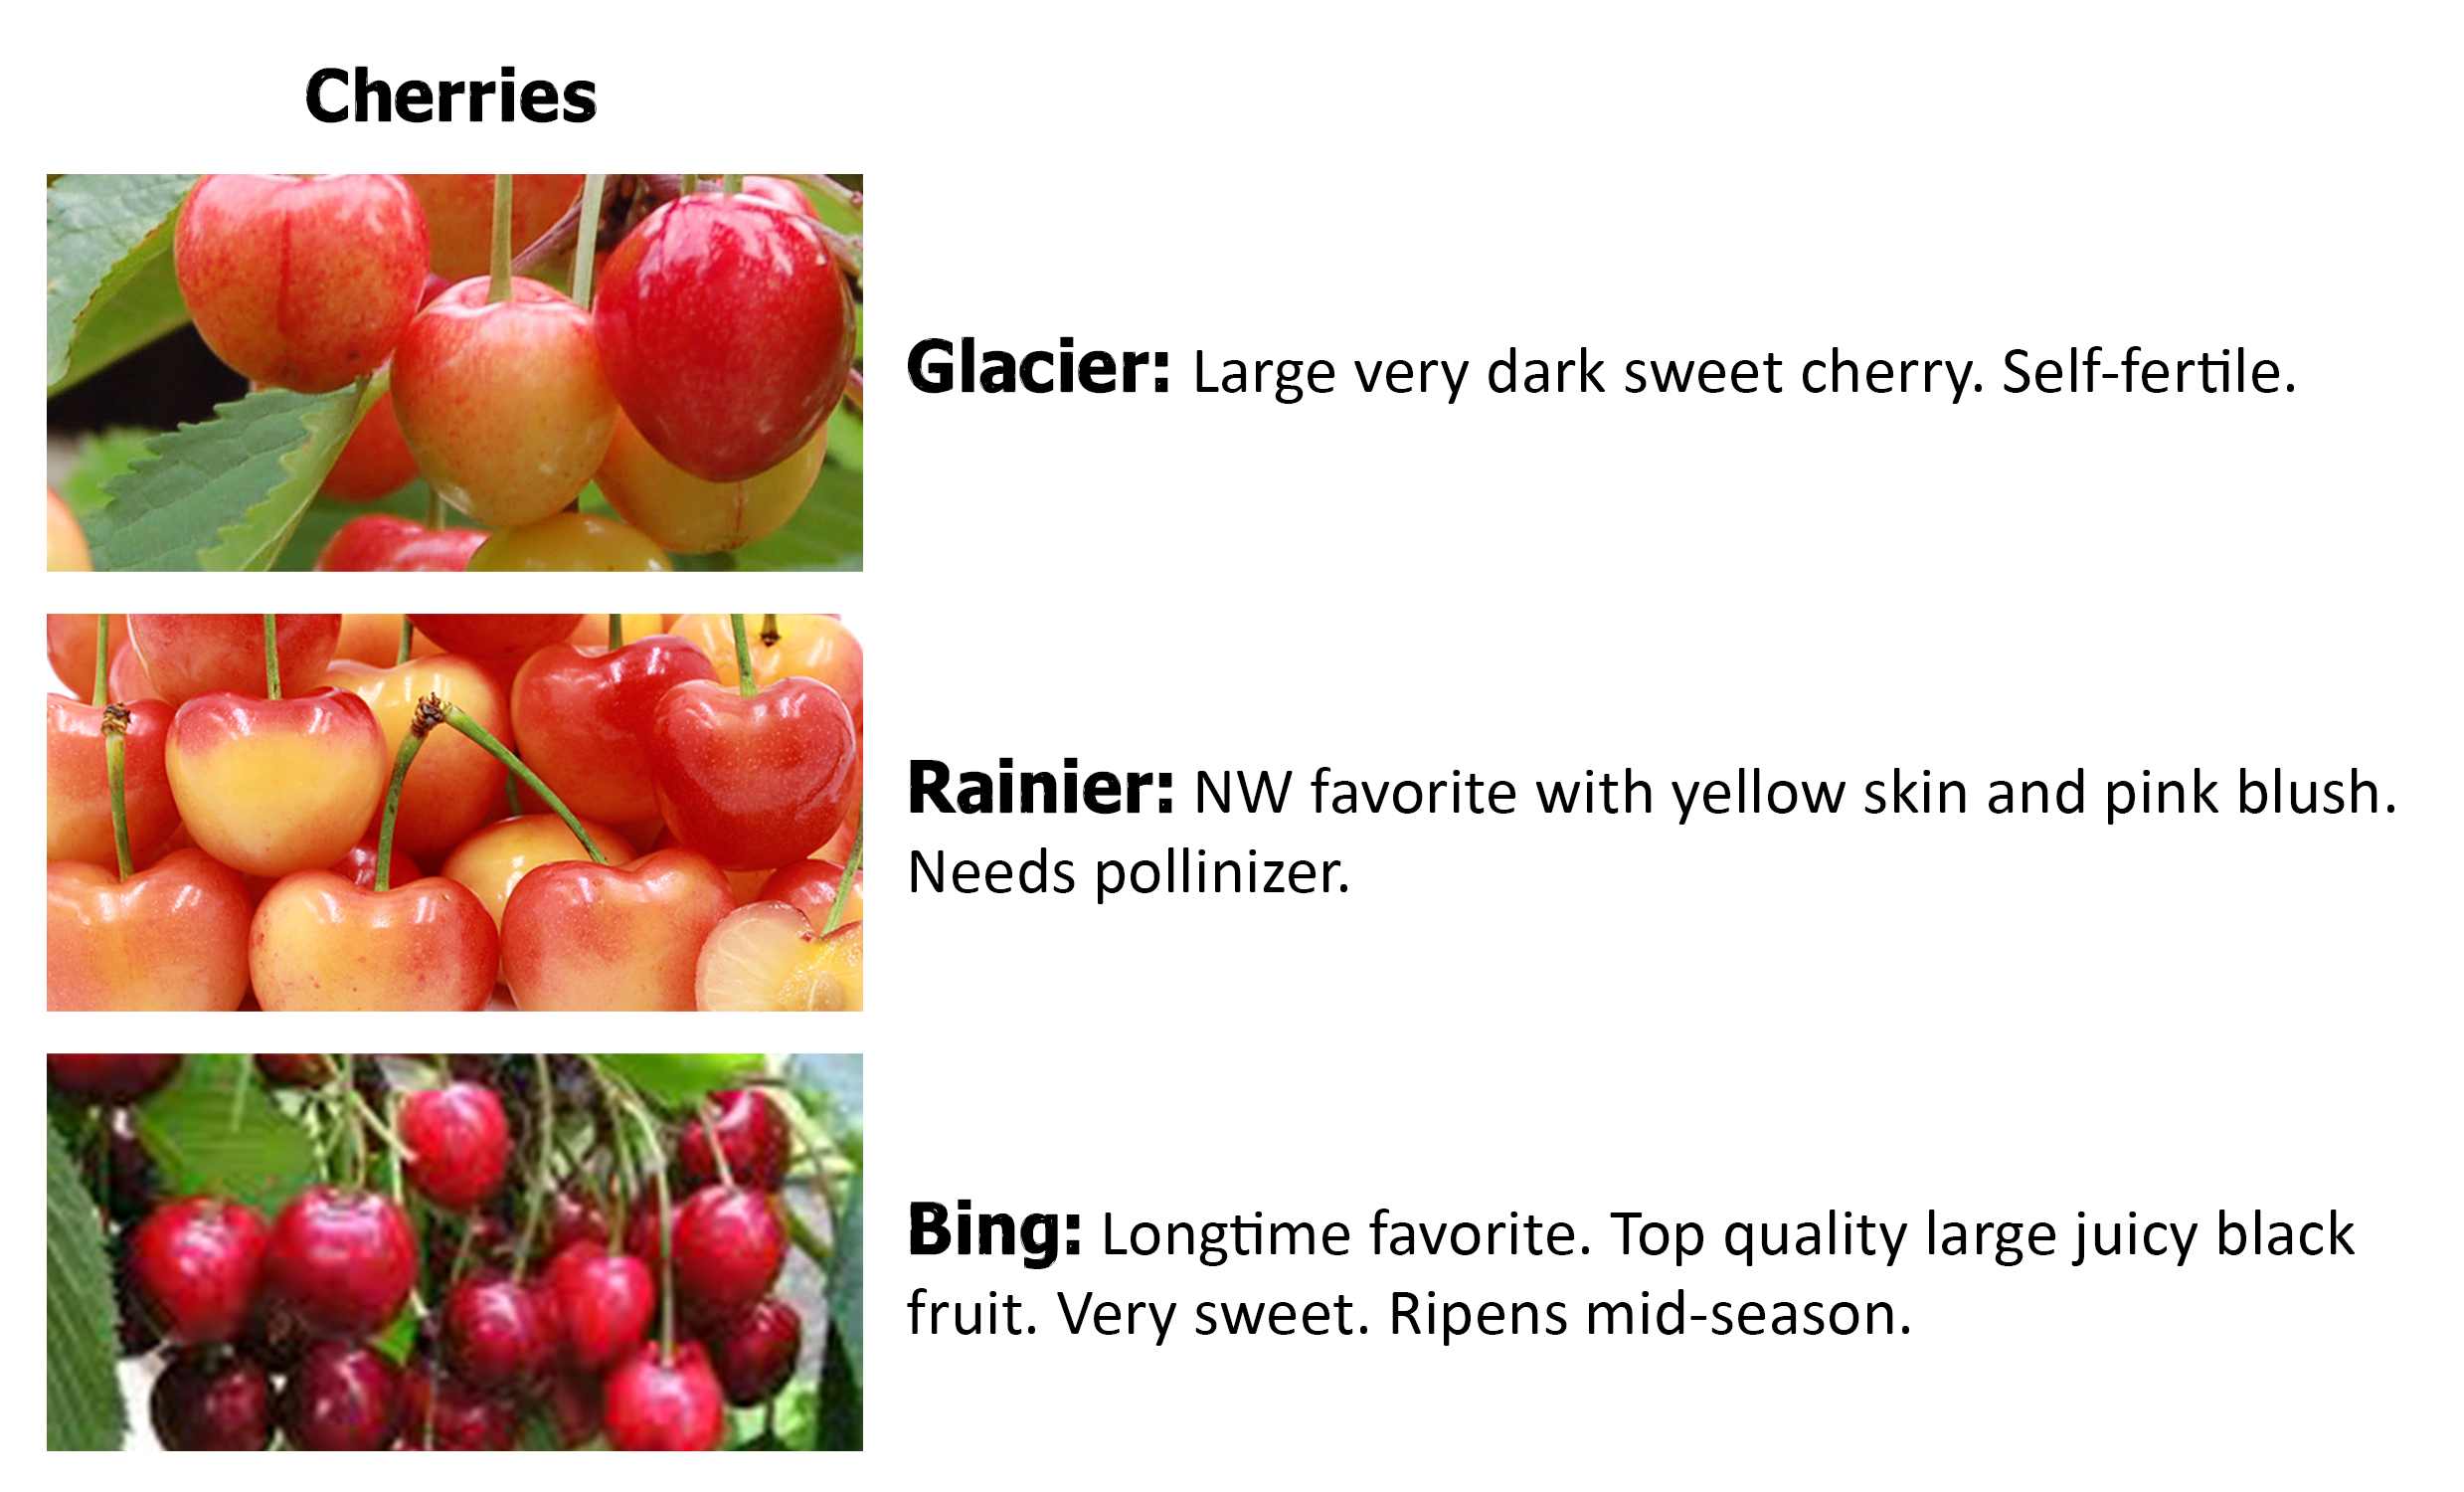

Selecting a Breed

Now that you’ve decided to raise your own chickens, it’s time to research the breeds and see which ones will be the best option for your needs. There are 3 basic groups; egg layers, meat breeds and dual purpose.

If you want to keep chickens only for egg production, a breed like the Rhode Island Red which produces around 260 eggs per year is an excellent option.

Other great egg production breeds include Sicilian Buttercup, Olive Egger, and Cuckoo Maran.

If you’re looking to raise meat birds to have your own organic chickens and don’t care much about egg production you’ll want to pick a breed like the Buff Orpington.

The Buff Orpington is a sweet, calm breed, they are easy to handle. The bird’s appearance is a heavy, broad body with a low stance, fluffed out feathers, and a curvy, short back. They tolerate confinement very well, and although they will free-range, they rarely forage, relying mainly on the feeders.

A dual-purpose breed like the Wyandotte is great for those that want a laying chicken as well as for meat production. Wyandotte is one of Americans’ favorite hens. The Wyandotte is a large, heavy bird. The roosters will weigh around 8-9lb, while the hens will weigh in around 6-7lb.

It is described as a deep, full-breasted bird with a broad frame. It has a large broad head with a rose comb. The general shape has been said to be round.

Some other great dual-purpose breeds include Barred Plymouth Rock, Welsummer, and Speckled Sussex.


Preparing the Brooder

Before you even consider bringing home baby chicks, make sure you have a brooder ready to home your new chicks! Baby chicks cannot keep themselves warm, you’ll need to have a warm area setup (draft free).

A large plastic container or a stock tank will work great as brooders. Stock tank can later be repurposed for gardening!

Whatever you are using, get the brooder set up and place warm and dry bedding on the bottom. Best option for bedding is pine wood shavings – Don’t use newspapers for bedding – it is bad for chicks and can cause leg problems because they are slippery to walk on.

Set up a heat lamp over the brooder, for baby chicks you’ll want the temperature to be 92F. Heat lamps come in clear and red bulbs, using a red bulb will keep your chicks calmer and reduce pecking.


Waterers and Feeders

Be sure to have waterers and feeders ready upon your baby chicks arrival.

A waterer like this one is a great option because it’s easy to clean and holds plenty of water. Plastic waterers are also a great option.

When selecting a feeder make sure it is one that will not allow the baby chicks to scratch the food out or scratch bedding into it. A feeder like this one will keep their food clean.


Food

While you’re picking up your baby chicks at your local feed store, be sure to grab their food as well. The Grange carries Purina, Scratch & Peck and Payback.

All of these are excellent options for baby chicks.


Remember…

Chicks will need to be kept warm for at least 6 weeks until their feathers have all come in. Even after that, they will still appreciate some extra warmth on cold days.

Always have fresh water and food available.

Baby chicks cannot defend themselves against predators so make sure your coop is well secured from rats, racoons and other animals.

Make sure the chicken coop is draft free and has a solid bottom to predators cannot dig their way into the coop.


https://www.instagram.com/thegrangeissaquah/

https://www.facebook.com/grangesupplyissaquah

The Color of Spring

Spring is here, and the on again off again sunlight is bringing the annuals and perennials out of their winter slumber and ready for prime time!

The Grange is showcasing numerous plants that are perfect for hanging baskets and deck pots. For those sunny locations we have Calibrachoa, (million bells), Petunias, Geraniums, and Bacopia.

Calibrachoa

For the shady location we have Fuchsias, Begonias, and Coleus.

Coleu

We also have non-flowering basket stuffers like Lysimachia, Glechoma, and Ipomea. Looking for something different? Try planting a strawberry basket and have those sweet red jewels at your fingertips all summer!

Come on by The Grange and take a look. We have plant deliveries coming in every week.

Cool Season Veggie Gardening

Here in the Northwest, there are two distinct “seasons” for growing. The “cool” season, (spring & fall) and the “warm” season, (summer).


Cool season veggies are defined by their edible parts i.e. leaves, roots and flowers (broccoli, cauliflower, lettuce, beets, carrots etc.). The one exception to this rule is peas. They do best in the cool season. It is important to note that the cool season veggies still need at least 1/2 day of sunlight or more.


If you are planning a cool season garden, start with the soil. It should be rich in composted material with good drainage. If your planting area is too wet, the seeds or starts will drown.

If moisture is a problem, you can try building up your bed with additional soil or compost. This would also be an ideal time to try a raised bed or container, such as a galvanized stock tank.


When planning you cool season garden, take into account what you actually will use. If you’re not fond of brussels sprouts, don’t plant them!

Start by mapping out your growing area. Taller plants in the back, shorter in the front. Peas are a climbing vine and will require a trellis. Carrots grow underground and will need loose viable soil to establish good root structure.

When mapping out your growing area be aware that some vegetables require more space than others. Peas, broccoli, cauliflower and cabbage take up more room and should be planted towards the back and spaced accordingly. Smaller plants like carrots and beets can be put up front as they need less space above ground.


When choosing a fertilizer, I’ve had the most success with a balanced N-P-K such as an organic 4-4-4, or synthetic 10-10-10. Keep in mind that organic fertilizers need a soil temperature of 50 degrees to active.

Another aspect of cool season gardens is that deer, bunnies and other critters see your planning and hard work as their personal salad bar!

There are various liquid and granular products that have odors to repel the deer or rabbits but the most effective is using a fence. For bunnies, a simple 24″ barrier of poultry nettling will keep them out. For deer, you should consider “boxing” in your garden with a fence at least 6′ or taller.

The Grange stocks all the products you will need to ensure a healthy and bountiful harvest. We have a full line of Gardner & Bloome Organic and Lilly Miller Synthetic fertilizers.


We also carry Down to Earth “simples”, (single ingredient) fertilizers.

For the four-legged pests we carry Bonide Repels-All and Liquid Fence Repellants to deter deer and bunnies.

To really shake them up we have Shake Away, coyote and fox urine granules. These create the presence of a predator in the area. Snails and slugs? We have Sluggo and Corry’s brand molluscicides.


Happy Gardening!

Raised Bed Gardening

 For those of us who have the itch to taste something grown in your own garden but don’t want to plow the “South 40”, or don’t have a “South 40”, read on! 

Gardening in the Northwest is always a challenge. With ideal weather we can be slicing big red tomatoes by July or in a more typical Northwest season, we’re still waiting for them to turn red in September!

In my case, that perfect area for my vegetable garden 10 years ago, has been reverting to primordial shade due to the growth of the surrounding trees. My options were to cut down all the trees, (not real neighborly) or move my garden!  A lot of gardeners have their “tricks” and “secrets” for getting the most out of the vegetable garden but the most success I’ve had, is growing in raised beds and large containers. The use of raised beds gives you better control of water, soil temperature, fertilizer application, weed and insect control and pollination. 

You can create a raised bed out of just about anything. The most common is creating a square or rectangle out of 2×8’s, place it on the ground and fill with soil. This type of bed can be any shape you want however it should not be wider than 4 feet so you can reach the middle without having to step into the bed.  Currently the most popular and easiest raised bed garden is a galvanized stock tank.

These come in various sizes and shapes. Note – make sure to drill holes in the bottom for drainage.  The “green light” to start your veggie garden is usually dependent on soil temperature. If we have a long cool spring it can take much longer for the ground to warm up. In a raised bed the soil will warm up faster, allowing you to get a head start on planting. A speedier warm up also increases the breakdown and availability of fertilizers and other soil amendments. 

Variety of stock tanks now available at The Grange!

Happy Gardening!

Soil Gardeners Strive to Have

The Ideal Soil Type: Loamy

loam-soil

Loamy soils are what gardeners strive to have. This soil type contains a balance of all 3 soil ingredients:

  1. Silt
  2. Sand
  3. Clay, as well as humus

The pH and calcium levels will be higher because of its organic matter content. Loamy soils are dark and mealy, soft, as well as dry. This soil type will have a tight hold on water and plant food, but it should drain well. Air should move freely in the soil all the way to the roots.

container17.jpg

You can test your soils by taking a handful and squeezing it like a stress ball.

Loamy soils will be smooth, have partial grit and form a sticky ball that will crumble easily. Although loamy soils are the ideal type of material to work with, fret not if you don’t have it in your garden. With the Gardner & Bloome soils and additives, you can get your soils to match what your plants need. There are many way to condition your soil. You can add beneficial soil inoculates, cover your soil with compost, or simply spray leaves and soil with compost tea.

A Soil Experiment:

If you would like to find out what soil type you have, here is a simple way to find out.

Fill a small jar with soil from your garden. Take samples from more then one place in your planting area. Shake the jar vigorously, then let the soil rest and it will settle overnight. The next day you should see the layers of the soil. Sand will be at the bottom, clay at the top and silt in between.

754f0759a34370990c5a34d0c94829bb

Stay tuned for more blog posts! In the meantime, try the jar trick and send us what type of soil you have and how you are managing the soil. 

Happy Planting!

Grow a pear!

7aa0e8b8e6ad768da832fc27fc4f7329

Asian Pears: These pears ripen a little on the early side, often by late August, early September. The crunchy texture and creamy white flesh of the Asian Pear is exceptionally juicy! They are round, sweet and crisp. Some say they eat like an apple but taste like a pear. Unlike regular pears, the Asian Pear is sold ripe and maintain their crisp texture long after they’ve been picked.


The Grange offers three varieties of Asian Pears:asianpear

If you plan to plant pears, plant at least two varieties because they need to be cross-pollinated to produce fruit. Just make sure that they’re compatible with each other. 


Why is pollination so important?

Because you want fruit! Some trees need pollination to grow fruit. Here are some of the basics of fruit tree pollination:

  • Most fruit trees require pollination between two or more trees for fruit to set.
  • Pollination occurs when the trees blossom.
  • Pollen from the anthers (the male part of the plant) has to be transferred to the stigma (the female part of the plant). Completed pollination fertilizes the tree and fruit grows. Otherwise, flowers grow, but not fruit.
  • Pollination can be performed by birds, wind or insects. The most common fruit-tree pollinator is the honeybee that gathers nectar from the flowers, simultaneously transferring pollen between them. (A single honeybee may visit as many as 5,000 flowers in a single day.)

How it’s done:

  • For best pollination, don’t plant fruit trees more than 100 feet apart.
  • Consider the fruit harvest. Fruit that’s not picked eventually will fall from the tree. Place the tree where fallen fruit won’t cause a problem — away from decks, driveways and walking paths.
  • Fertilizer isn’t recommended immediately after planting trees. They go through a kind of shock when they’re put into the ground, and fertilizer can burn tender roots. Water is all that’s needed at first. Spread pine bark mulch in a 4-foot diameter about 6 inches deep around the tree to help retain moisture. Don’t use hardwood bark because it can release acids that lower nitrogen levels, which can weaken the tree.
  • Once the tree is established, use a mild, slow-release fertilizer, like a 10-10-10, for the first year, following the manufacturer’s directions. This promotes root growth, the overall health of the tree and a strong bud set, which leads to better pollination.
  • Water fruit trees once a week during dry spells, especially during the first two years after planting. Allowing a tree to go dry can cause a weak bud set or even cause the flowers to drop early. That means poor pollination and little or no fruit. Apply enough water to soak several inches into the soil.
  • Spray the trees with dormant oil to smother mites and insect eggs that later emerge and damage the buds. Spray it on the trees while they’re dormant, on one of the warmest and sunniest days in February. Follow the manufacturer’s directions for mixing and application, as well as all of the safety recommendations, like wearing a respirator, gloves and goggles.
  • To help honeybees pollinate fruit trees, don’t apply pesticides during bloom time. Bees are very susceptible to almost all pesticides. And even if other insects are the target, the bee population can be seriously damaged.
  • Remove nearby dandelions and other broad leaf weed flowers before the trees blossom so the bees won’t be distracted from their fruit-tree pollination job.

 Here are our 2017 Fruit Tree varieties:

apples.png

apricottree

cherrytrees

columnarapples

peachtrees

plumtrees


Ferment your Chicken Feed

What is Fermenting?

It is the process of covering chicken feeds in liquid and allowing it to sit for a few days. By allowing it to set, it creates probiotics that assist in digestion and gut health.

If you’re raising chickens for eggs, numerous studies have shown that fermenting chicken feed to give to your chickens can increase egg weight and eggshell thickness, and boost the chickens’ intestinal health and immune system, increasing their resistance to diseases including Salmonella and E.coli.

a-shocked-chicken

(some) Benefits of Fermenting:

  • Feed consumption and waste will drop by 1/2 to 3/4 (this will save you money).
  • Poultry on a diet of fermented feed are generally healthier and less likely to contract disease.
  • There is almost zero waste as chickens don’t scratch through it, kicking it out of the feeder.
  • Egg yolks of eggs laid by hens on fermented feed will become noticeably larger, and shells will be more solid.

chicken

How to Ferment:

  1. On Day 1 fill a half gallon mason jar (or other suitable container) with your desired amount of chicken feed.
  2. Fill your container with filtered water until it covers the feed by an inch or two.
  3. Add a lid and set it on the counter to wait 3 days.
  4. On Day 2, repeat Step 1 and set the jar next to Day 1.
  5. On Day 3, repeat Step 1 and set the jar next to Day 1 and Day 2
  6. On Day 4, empty the fermented chicken feed from Day 1 into a bowl and feed it to your hens.  Watch them go crazy for it!  Wash your jar and repeat Step 1.  Place your jar at the end of the line next to the jars from Day 2 and Day 3.
  7. On Day 5, feed the fermented chicken feed in the jar from Day 2 to your hens, wash your jar, and start the process all over again.

fermentedchickenfood-web5


10 Tips For Successful Fermenting: The Do’s

  • Use a mix of grains, oats, seeds, legumes, crumble or pellets. You can make your own poultry feed formulation, or use a commercially available brand.
  • Use a loosely covered glass container.
  • Use de-chlorinated water – use either well water, purchased filtered water or let tap water sit out for 24 hours.
  • Wait until you see bubbles forming on the surface to feed (usually after about 3 days).
  • Store in a dark, cool place, not outside and not in the sunlight.
  • Your fermented feed will have a smell. That’s okay. It should smell sort of tangy-sweet, like sourdough bread.
  • Keep the liquid after you’ve strained out your grains to start a new batch.


fermentationbasket_contest

For a chance to win, click on the link below! *Basket must be picked up, no deliveries.
Winner will be announced 1/31/2017

Enter to win here!


Growing Garlic

Easy as 1-2-3!

alho


Growing garlic is a gardener’s answer to whose green thumb isn’t at their prime yet. It’s insanely easy to plant, care for and takes up so little space in your garden bed. The end results are beautiful and full of great taste garlic bulbs that you’ll be fully satisfied with!

larry_purple_garlic

Selecting Your Garlic

They’re two type of categories for garlic:

  •  SOFTNECKS: Get their name because the whole green plant dies back and leaves nothing but the bulb with flexible stems that make it easy to braid. This category is easiest to grow in regions where the weather is mild and keep longer than hardnecks. However, they’re less hardy and are likely to produce small, very-strong flavored cloves.

music-garlic-bulbs-cut-open

Red Toch

  • HARDNECKS: Have a stiff stem in the center that ends in a beautiful flower, or a cluster of little bulbs, which then dries to a rigid stick that makes difficult to braid. This category of garlic thrives best where there is a real winter. When growing in warmer climates, they refuse to produce and are more vulnerable to splitting.

chesnok-red

Chesnok Red

Planting Your Garlic

  • Plant your bulbs in mid- fall ( October for most temperate places in the U.S. or at least 3 weeks before the ground freezes) so your garlic can grow their own root system before winter arrives.
  • Make sure that the soil is loose, weed- free and very fertile.
  • Divide the bulbs into cloves but don’t remove all of the papery covering on each clove.
  • Plant the cloves root side down about 8 inches and 2 inches below soil.
  • Space your garlic 6 inches apart -> the further your garlic is spread, the better!
  • TRICK: You can plant your cloves around & between other plants in your garden in use as an alternative to pest control.
  • Green shoots will come up and will need mulcharound them.
  • Avoid pouring watering into the crown of your plants!

And that’s all of the hard work that it requires!

Harvesting Your Garlic

  • Depending on the type of garlic that you’re growing will determine when it will be harvested.
  • These varieties are divided by early, mid-season and late. However, it depends not only on your climate zone but on the weather you have during your growing season. Meaning; the warmer the growing season, the faster they’ll grow!
  • When the lower leaves have browned yet the upper leaves are still green… it’s time for the bulbs to be harvested.
  • Make sure to harvest your bulbs on an overcast day when the soil is dry.
  • Gently loosen the soil with a digging fork while making sure to keep it away from the heads and then lift them out of the soil.

m

Putting Your Lawn Into Rehab!

Putting Your Lawn Into Rehab!

Lawns are an interesting phenomenon.  We homeowners will dedicate small and large pieces of land to the planting, care and maintenance of only one desired organism.  This botanical organism is prone to stress from naturally occurring events like sun/shade and rain/drought. In addition, the homeowner is trying to isolate this one plant from invasion by other plants and wind borne seeds as well as a Northwest bumper crop of moss and algae!

(Moles, voles, raccoons, dogs and cats are fodder for a separate blog!)

Before you throw your hands in the air and surrender your lawn to either the onslaught of marauding blackberry or pay enough to put your lawn professional’s kid through Harvard, lets break down the various aspects of caring for your lawn and maybe you’ll re-gain the confidence to bring it back from the land of the lost.

Your soil is a major player in the success of a healthy lawn.  The germinating seed must have something to root into. When it roots into thatch, moss or hard-pan, the roots stay small which translates to stunted growth above ground. For those who just want to throw out some seed and hope for the best, remember my corny adage, “Why throw babies out where the adults can’t survive?”

Aerating the soil is a great first step.  You can either rent an aerator or have a local landscape/yard care professional do the job for you. De-thatching is also recommended if it hasn’t been done in a few years.  It is very important that the new seed has soil to root into and not a layer of thatch or moss.  After de-thatching you should rake out the area.  Aerating will leave numerous plugs of soil on the surface.  Leave them there as they will break down when exposed to watering

If moss is a major problem, you can attack it either before or after aerating.  Moss can be controlled with Ferrous Sulfate, (iron) which will kill it and turn it black. Rake out the dead moss and throw it in the yard waste bin. Another method for controlling moss is to add lime to your soil twice a year.  This makes the soil less acid and more alkaline.  Moss, as well as native plants do not like alkaline soil so keep the lime away from Rhodies, Azaleas, Camellias, Blueberries etc.

Note – I had a major problem with moss over ¼ of my front lawn.  I started calculating the expense of trying to control it in this area and quickly realized I could put that money to better use!  I cut out the scraggly thin lawn and planted a few native shade-loving plants and it looks great, moss and all!

Note 2 – Moss is a natural organism which grows abundantly in the Northwest.  In addition to growing on the ground it will climb trees and call in a few friends like algae and lichen.

To some, this symbiotic relationship is not the most attractive but bear in mind it does not harm the tree at all.  In fact, most attempts to eradicate it will end up doing more harm to the tree than the moss.

Choosing the right seed for your lawn is just about as important as the preparation.  Blends of Perennial ryegrass work best in sunnier locations and Fescue blends are better for shade.  At The Grange we carry blends for everything from full blazing sun to heavy shade.  Our seed comes out of Northern Oregon and is ideal for this area.

Using a hand or push broadcast spreader is best to insure even coverage although smaller areas do well with hand spreading.  Once the seed has been spread lay down another thin layer of compost to cover the seed.  This will help keep moisture around the seed as well as protect it from birds.

For those who have “dog spots” (as I call them) one trick is to fill a 5 gal bucket ½ full with compost and about 2 handfuls of seed.  Add water to make a paste.  Scratch up the “spots” with a bow rake and make a “mud pie” from the bucket and pat it over the spot!

It is not critical to apply fertilizer at this time but if you feel the need, we recommend using an organic lawn food.  Organics will not burn the new seedlings and work to help improve the soil.

Now the easy part is done!!

Watering…watering…watering.  The new seed must be kept damp. This is why spring and fall are the best times to re-seed as the rains help to keep the soil moist.

Now, you’ve saved enough money to put your kid through Harvard!

Email any questions to me at Michaela@grangesupply.com

Vegetable Gardening!

VEGETABLE GARDENING


Vegetable gardening in the Northwest is always an adventure. Our ever-changing weather patterns have sent the urban farmer back to the drawing board, looking to utilize that unpredictability to our benefit.

Leading the way is the use of raised beds, containers and straw bales which help to warm the soil faster and allow earlier planting of seeds and starts.

In addition, raised beds, etc. give you greater control of growing conditions such as soils, fertilizer application and pest management.

There are literally hundreds of books, articles and publications that rely on specially blended soils, homemade fertilizers, PH adjusting amendments and more.

Our intent is to help you understand the basics, so you can then experiment and add your own personal touch.

There is no absolute right or wrong in gardening.  What works for you and produces the best results is the right choice.


Soil

Soil is a combination of ground rocks, decomposed organic plant material, sand and clay.  It also harbors trace amounts of minerals, insects, beneficial microbes, bacteria, fungal growth, water and air.

The Grange offers the following soils and amendments to compliment your particular type of garden.


Potting Soil – A lightweight blend containing a good amount of peat moss and perlite.  A great choice of indoor houseplants and any native plants that require an acid soil.


Planting Mix – Combination of topsoil, compost and PH adjusters. Great as an all purpose soil for garden beds and outdoor containers. Can be used for direct planting.


Planting Compost – Similar to the planting mix but heavier on the compost. Can be planted directly.  Best for planting fruit trees or larger broadleaf and coniferous trees.


Raised Bed Mix – Good, lighter weight “ready-to-use” soil for the raised bed or container,


Soil Building Compost – This is a good “all purpose” compost used for supplementing garden beds, top dressing flower beds and as a mulch to cover new grass seed.


Harvest Supreme – Mostly used to amend garden beds. This is a very rich compost that should be mixed in with existing soil.  It contains 15% chicken manure making it the only additive you will need for refreshing your garden beds.


For those folks who prefer the old standbys, we still carry chicken and steer manure as well as wormgold compost.


Fertilizer

N-P-K – This is the rating given to fertilizers that indicates the percentages of active ingredients.  The numbers differ in regards to what is being fertilized.


N – Nitrogen.  This is for greening.  Higher nitrogen is used for lawns, conifers and other “non-flowering” plants. Blood meal, fish meal, bat guano and ammonium sulfate are good sources for nitrogen.


P – Phosphorous. For buds and blooms. Those fertilizers listed for flower production will have a higher P percentage.  Bone meal, fish bone meal, soft rock phosphate and triple super phosphate are good sources of phosphorous.


K – Potash. This aids in root development and general plant health.  Higher levels of potash are good for root crops like potatoes, carrots and beets. Kelp meal, myriad of potash and wood ash are good sources of Potash.


Organic vs synthetic – The most noticeable difference is in the NPK ratings.  Synthetics can be concentrated to reach higher levels.  Lawn food can be as high as 46% nitrogen whereas organic lawn food is usually around 9%.

Synthetics directly feed the plant, organics feed the plant as well as the soil microbes.

Some synthetics are coated for a timed release feeding and will provide food earlier in the season when the soil is cool. Organics tend to last longer but usually activate when the soil is above 50 degrees.


Over-fertilizing with organics is usually just a waste of fertilizer but over doing it with synthetics can burn the plant and lead to shorter root growth and decreasing plant health.


Organic vs Certified Organic – “Organic” means the ingredients come from natural organic materials such as cottonseed meal, bone meal, etc.

“Certified Organic” means there is a paper trail documenting that the ingredients were grown free of GMO’s, synthetic pesticides, and chemicals.


What & When

Veggies are broken down to cool and warm season.

Cool season vegetables are those of which we eat the leaves, flowers and roots, (lettuce, broccoli, carrots, spinach).

Warm season includes those that provide us with seeds, pods and actual fruit, (tomatoes, green beans, squash). The one exception is that peas prefer a cooler season.

Contingent on the weather, cool season can be planted March through May with a secondary planting in August.  Warm season usually starts around late April to mid May or whenever the soil temperature reaches 50 degrees.